Storj
Storj is a decentralized peer-to-peer file storage system, and new protocol being added to FileZilla.
Source code is available at https://svn.filezilla-project.org/filezilla/FileZilla3/trunk and depends on https://docs.storj.io/dcs/api-reference/storj-client-libraries
To check out the code with subversion:
svn co https://svn.filezilla-project.org/svn/FileZilla3/trunk filezilla
And enable using:
./configure --enable-storj
Quick setup[edit]
- Add a new site in the Site Manager and select Storj as the protocol
- Enter gateway.us1.storjshare.io as the host and 443 as the port
- Note: us1, eu1, and ap1 are the current gateways. Use the closest gateway.
- Enter the bridge user name and password
- If you have not created an Encryption Key before, generate a new one, otherwise add your existing key
- Connect to the server and begin uploading and downloading files
Introduction[edit]
FileZilla is a fast and reliable cross-platform FTP, FTPS, SFTP and Storj client with many useful features and an intuitive graphical user interface. A server-client is also available.
Below are some of the FileZilla client features:
- Easy to use
- Supports Storj, FTP, FTP over SSL/TLS (FTPS) and SSH File Transfer Protocol (SFTP)
- Cross-platform. Runs on Windows, Linux, *BSD, Mac OS X and more
- IPv6 support
- Available in many languages
- Supports resume and transfer of large files >4GB
- Tabbed user interface
- Powerful Site Manager and transfer queue
- Bookmarks
- Drag & drop support
- Configurable transfer speed limits
- Filename filters
- Directory comparison
- Network configuration wizard
- Remote file editing
- Keep-alive
- HTTP/1.1, SOCKS5 and FTP-Proxy support
- Logging to file
- Synchronized directory browsing
- Remote file search
FileZilla incorporates the Storj asynchronous multi-platform C library for encrypted file transfer on the Storj network into its back end to ensure the highest level of performance and stability. This library is also the back end to the native libstorj CLI.
In this guide, we will run through the process of setting up FileZilla to be able to up and download painlessly to the Storj Cloud.
Setting up a Storj account[edit]
Before we can start uploading and downloading to the Storj network, it is necessary to open an account on a Storj Satellite. The Satellite acts as an interface to the Storj network and manages all the complicated stuff in the background, making it completely painless for a user to start using the Storj network.
Registering an account via Satellite (STORJ Signup)[edit]
If you already have a Storj account, you can proceed directly to section 3.2.
To register a new account, click on the Sign Up link (Figure 3.1). Once on the registration page, enter your email address and desired password, then click the check box to agree to the terms of service and finally click on "Sign Up" (Figure 3.2).
Now check your email inbox and click on the account activation link sent to you by Storj. A web page should open with the account activation confirmation. Note that sometimes the email automatically gets moved to the spam/trash folder by some email providers, so if the email is not in the inbox, make sure to check the spam folder. Now
that the Satellite account is created, you can login (Figures 3.1) and you will be presented with your Satellite dashboard page.
Configure billing to upload/download beyond the free tier limit[edit]
Currently the free tier for Storj renters is structured as follows:
- Uploading limit: 50GB/month.
- Downloading limit: 50GB/month.
(Data obtained from: Storj Billing. If you want to upload or download beyond the free tier, a payment option can be added to the Billing tab of your account on storj.io.
Payments options currently include:
- STORJ token
- Credit Card
Once your billing information is added, the free tier limit will be lifted and you will now be able to upload and download as much as you like/can afford!
These are the current storage and bandwidth prices (they apply only after you exhausted your monthly free tier limits):
- Storage -> $4 per TB used per month
- Download Bandwidth -> $7 per TB downloaded
- Upload bandwidth -> free
This information was extracted from pricing.
Important things to note regarding the billing structure:
- You only pay for the time span that your data was stored on the network, if you delete some of your files today you will not pay for them anymore tomorrow, you will stop getting charged for storage right after you delete the files.
- Your storage usage is added daily to your "Current Usage" in the billing section. However, if your billing method is by credit card, you will only be billed once per month (normally on the 22nd of every month). For pre-paid billing methods like STORJ token or BTC, your pre-paid balance will be reduced daily according to your usage but again actual amount deducted from your balance will be reconciled at the end of the billing cycle taking into account your free tier allotment.
- The free tier allotment is subtracted from your paid tier every month, thus if you upload 100GB in a given month, you will only pay for 75GB (100GB – 25GB free tier) at the end of the billing cycle.
Configure FileZilla with Storj[edit]
Follow the official guide over at Storj.io
https://docs.storj.io/dcs/how-tos/set-up-filezilla-for-decentralized-file-transfer
Creating a folder, uploading and downloading files[edit]
This step is very easy. Once connected to our account, there are two main sections of the GUI, namely:
- Local site (your computer) - Left pane
- Remote site (the Storj cloud) - Right pane
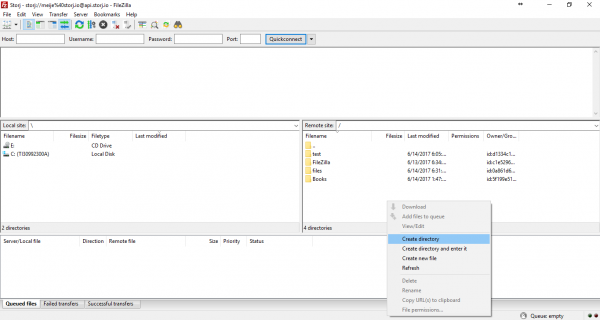
If you already have some folders (buckets) in your Storj account, they will be displayed in the Remote site pane. You can easily create a folder by right clicking somewhere in the remote site pane and selecting Create directory (Figure 5.1).
Note: You can add as many folders as you want and also add sub-folders!.
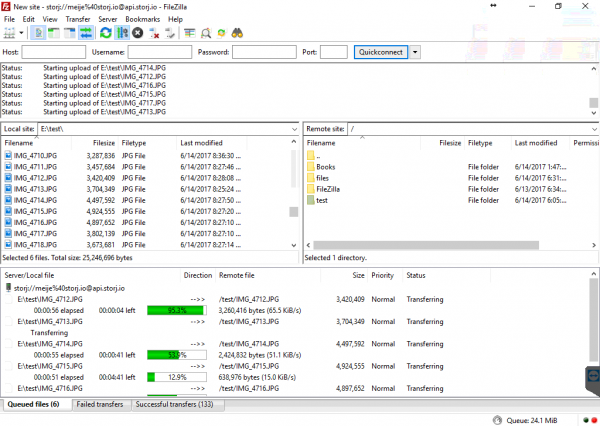
You can now browse to the files/folders you want to upload in the Local site pane and upload them by dragging-and-dropping them to the Storj folder you created in the Remote site pane.
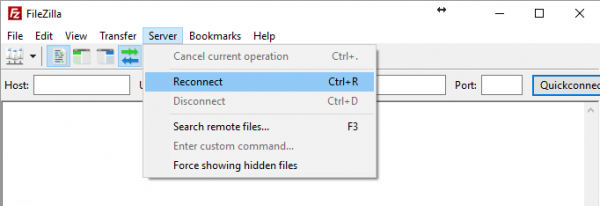
Tip: If you can't add a directory, you can reconnect to Storj by doing the following:
- Go to
Server->Reconnect(Figure 5.3).
Downloading files is just as easy, only this time drag-and-drop the files from your folder in your Remote Site pane to a folder of your choice in the Local Site pane. That's it!
Frequently Asked Questions[edit]
What is an Encryption Key?[edit]
The Encryption Key is a series of 12 to 24 words that represents 128 to 256 bits of entropy that is used to encrypt files before they are uploaded into the network.
Here is an example Encryption Key:
legal winner thank year wave sausage worth useful legal winner thank year wave sausage worth useful legal will
If you're familiar with BTC, this will be recognizable as it's based on the BIP39 standard.
You can also use your own encryption phrase.
How are files encoded before being uploaded to the Storj network?[edit]
https://docs.storj.io/dcs/concepts/overview#what-happens-when-you-upload
Note: For larger files the time it takes to do this preparation step can be more noticeable.
Can I rename or move files?[edit]
Server Side Move
The new uplink binary has now a server side move command. You can rename a file or move it to a different folder or even bucket. Renaming a folder is not possible at the moment. We might implement that in a future release.
FileZilla doesn't supported this feature at the moment.
How many files can I upload?[edit]
There currently isn't a hard limit an the total number of bucket entries that can be added to a bucket.
Why can't I upload a file at the root?[edit]
FileZilla currently maps buckets as directories at the root level and each file within those buckets is a bucket entry. Sub-directories are created by having a forward slash in the bucket entry name, which are parsed and shown as a directory within FileZilla. For this reason, it's not possible to add a file to the root because there isn't a bucket to add a bucket entry.
Conclusion[edit]
In this simple guide, we first created a Storj account and added a billing option. We then imported our account details into FileZilla and adjusted a few parameters in the client settings. Finally, we learned how to add a folder to out Storj account and how to up- and download files to and from this folder. FileZilla has many more advanced features and settings, so if you want to learn more about FileZilla, please have a look at the official FileZilla wiki page.
We are constantly improving Storj and all of its tools to make sure that both renters and farmers can interact harmoniously in the Storj ecosystem. We would love to hear from you, no matter if you have suggestions, comments, questions or criticisms you would like to share.
- Community chat: Storj Community.
- Storj feedback: Storj product feedback.
Community & Support[edit]
Please sign up for the Storj community chat at: https://community.storj.io/ and ask any questions you may have in the #filezilla channel.
Debugging[edit]
It's possible to view full detailed logs for file transfers. To enable it (you'll need to do this each time you start up):
- Open up the Preferences/Settings
- Go to Logging and optionally enable timestamps and select a file to log
- Go to Debug and select "4 - Debug"
- View logs in the command console


