Difference between revisions of "FileZilla Client Tutorial (en)"
| Line 65: | Line 65: | ||
=== Downloading === | === Downloading === | ||
| − | + | D\\\\\\\, works essentially the same way as uploading - you just drag the files/directories from the remote pane to the local pane this time, instead of the other way round. | |
'''Note:''' In case you (accidentally) try to overwrite a file during upload or download, FileZilla will by default display a dialog asking what to do (overwrite, rename, skip...). | '''Note:''' In case you (accidentally) try to overwrite a file during upload or download, FileZilla will by default display a dialog asking what to do (overwrite, rename, skip...). | ||
Revision as of 22:02, 12 May 2012
This tutorial in other languages: English (English), Deutsch (German), Español (Spanish)
Note to editors: Please read this note on the tutorial scope before making additions.
Introduction
Welcome to the FileZilla Client tutorial. In this tutorial, you will learn how to
- Connect to an FTP server,
- Download and upload files,
- Use the site manager.
If you already know how to use an FTP client, you may want to read the more advanced usage instructions instead.
We assume that you already installed and started FileZilla Client (installation instructions).
Connecting to a server
The first thing to do is connecting to a server.
This is our (fictional) login data - please use your own data instead if you want to actively follow the tutorial.
 Hostname: example.org
 Username: john
 Password: 7PjU#.J3
We will use the quickconnect bar for establishing the connection:
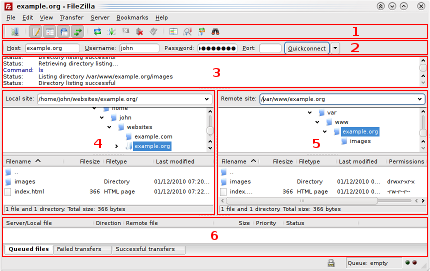
Enter the hostname into the quickconnect bar's Host: field, the username into the Username: field as well as the password into the Password: field. You may leave the Port: field empty unless your login information specifies a certain port to use. Now click on Quickconnect.
Note: If your login information specifies a protocol like SFTP or FTPS, enter the hostname as follows: sftp://hostname or ftps://hostname respectively.
FileZilla will now try to connect to the server. If all works well, you will notice that the right "column" switched from Not connected to any server to displaying a list of files and directories.

The next step is to get familiar with FileZilla's window layout.
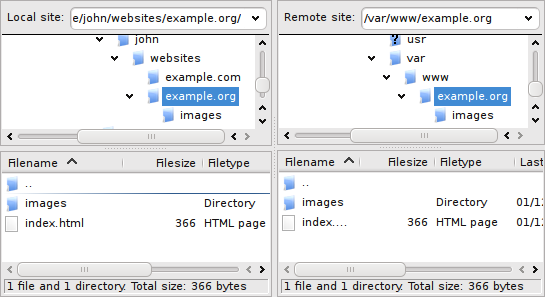
Here is a quick introduction: Below the toolbar (1) and quickconnect bar (2), the message log (3) displays transfer and connection related messages. Below, you can find the file listings. The left column (local pane, 4) displays the local files and directories, i.e. the stuff on the PC you're using FileZilla on. The right column (server pane, 5) displays the files and directories on the server you are connected to. Both columns have a directory tree at the top and a detailed listing of the currently selected directory's contents at the bottom. You can easily navigate either of the trees and lists by clicking around like in any other file manager. At the bottom of the window, the transfer queue (6) lists the to-be-transferred and already transferred files.
Transferring files
Now we will upload these files (or the ones you choose, respectively):
 website/
 +- index.html
 +- images/
    +- image01.jpg
    +- image02.jpg
Uploading
First - in the local pane - bring the directory into view which contains data to be uploaded (e.g. index.html and images/). Now, navigate to the desired target directory on the server (using the server pane's file listings). To upload the data, select the respective files/directories and drag them from the local to the remote pane. You will notice that the files will be added to the transfer queue at the bottom of the window and soon thereafter get removed again - since they were (hopefully, if nothing went wrong) just uploaded to the server. The uploaded files and directories should now be displayed in the server content listing at the right side of the window.
Note: If you don't like using drag-and-drop, you can also right click on files/directories (in the lower local pane) and select Upload to upload them - or simply double-click a file entry (this does not work for directories).
Note (advanced): If you enable filtering and upload a complete directory, only the not-filtered-out files and directories inside this directory will be transferred.
Downloading
D\\\\\\\, works essentially the same way as uploading - you just drag the files/directories from the remote pane to the local pane this time, instead of the other way round.
Note: In case you (accidentally) try to overwrite a file during upload or download, FileZilla will by default display a dialog asking what to do (overwrite, rename, skip...).
Conclusion
You should now be able to use the basic FileZilla features.
One final remark: Most tasks can be completed in several ways. The ways chosen for this tutorial are the most clear ones - if you invest a bit of time and just look around or read some of the advanced documentation, you will find much quicker ways to achieve what you want (there are toolbar buttons for often-used commands for example; some also react on right-clicking them).
If you feel reasonably confident by now, it might be worthwhile to also read the advanced usage instructions to learn about additional features not shown in this tutorial.
Further information
- Documentation: Documentation for the most important topics
- Site manager: Details about how to set up your sites in FileZilla
