Using: Difference between revisions
m (→Synchronized Browsing: Improve formatting) |
|||
| (50 intermediate revisions by 28 users not shown) | |||
| Line 1: | Line 1: | ||
= Quick Guide = | = Quick Guide = | ||
This guide gives you a short overview on how to use FileZilla. By default you don't have to configure FileZilla, so you can start directly working with the program. | This guide gives you a short overview on how to use FileZilla client. | ||
By default you don't have to configure FileZilla, so you can start directly working with the program. | |||
| Line 7: | Line 8: | ||
===Using the Quick Connect bar=== | ===Using the Quick Connect bar=== | ||
To connect to an FTP server, enter the address of the server into the host field of the Quickconnect bar ( | To connect to an FTP server, enter the address of the server into the host field of the Quickconnect bar (e.g. example.com - see image below). If it is a special server type like an SFTP server, add the protocol in front of the address. In case of an SFTP server, start the address with 'sftp://' (e.g. sftp://example.com). Enter the port of the server into the port field if it is ''not'' the default port (21 for FTP, 22 for SFTP). If a username / password is required, enter it in the corresponding fields, otherwise the default ''anonymous'' logon will be used. Click on Quickconnect or press Enter to connect to the server. | ||
[[Image:Enter-info.png]] | [[Image:Enter-info.png]] | ||
| Line 25: | Line 26: | ||
== Navigating on the server == | == Navigating on the server == | ||
After a successful connection attempt, a list of files and | After a successful connection attempt, a list of files and directories appears on the '''right''' side of the main window. The name of the current remote directory is listed in the edit field on the top. Below that you will see the remote directory tree. Under the remote directory is a list of the contents of the current remote directory. | ||
To change the current remote directory: | |||
* Type a directory name into the edit field and press enter, or | |||
* Click a directory in the directory tree, or | |||
* Double-click a directory in the list of the current directory contents | |||
You will notice a directory called ".." listed in virtually all directories. Selecting this directory allows you to go up to the parent directory of the current directory. | |||
Question marks ("?") appear on directories you haven't accessed yet, indicating that the FileZilla Client can't tell if there are subdirectories within those directories. If you access the directory the question mark will vanish. | |||
[[Image:Navigating-remote.png]] | [[Image:Navigating-remote.png]] | ||
| Line 31: | Line 42: | ||
== Navigating on your machine == | == Navigating on your machine == | ||
Navigating on your machine works almost like navigating on the server. The current local | Navigating on your machine works almost like navigating on the server. The current local directory and the local directory tree are displayed on the '''left''' side of the main window by default. | ||
[[Image:Navigating-local.png]] | [[Image:Navigating-local.png]] | ||
| Line 39: | Line 50: | ||
If you have an identical directory structure on the local machine and the server, you can enable synchronized browsing. This means that any directory navigation on one machine is duplicated on the other. | If you have an identical directory structure on the local machine and the server, you can enable synchronized browsing. This means that any directory navigation on one machine is duplicated on the other. | ||
To enable synchronized browsing, create an entry in the Site Manager, and on the Advanced tab, ensure that the Default local directory and the Default remote directory have the same structure. Then check " | To enable synchronized browsing, create an entry in the Site Manager, and on the Advanced tab, ensure that the Default local directory and the Default remote directory have the same structure. Then check "Use synchronized browsing", save your settings, and connect. | ||
== Directory Comparison == | == Directory Comparison == | ||
| Line 49: | Line 60: | ||
== Transferring files == | == Transferring files == | ||
You can upload or download a file by double-clicking on it. It will be added to the transfer queue and the transfer starts automatically. To transfer | You can upload or download a file by double-clicking on it. It will be added to the transfer queue and the transfer starts automatically. To transfer directories and/or multiple files, select them and right-click the selection. Then you can click on Upload/Download in the popup menu. | ||
[[Image:Transfer-rightclick.png]] | [[Image:Transfer-rightclick.png]] | ||
| Line 56: | Line 67: | ||
You can also drag the files from one side and drop them on the other side. To add files to the queue so that they will be transferred later, select them and click Add to Queue from the popup menu. You may also drag the files directly into the queue. Click on the [[Image:Process-queue-button.png]] button on the toolbar to start the transfer. | You can also drag the files from one side and drop them on the other side. To add files to the queue so that they will be transferred later, select them and click Add to Queue from the popup menu. You may also drag the files directly into the queue. Click on the [[Image:Process-queue-button.png]] button on the toolbar to start the transfer. | ||
Or, you can click on a file, then drag the file (a box is added to the arrow cursor) to the | Or, you can click on a file, then drag the file (a box is added to the arrow cursor) to the directory where you want to move it. The directory will be highlighted when you are over it. Let go of the mouse button and the file will be moved to the directory. | ||
[[Image:Transfer-drag.png]] | [[Image:Transfer-drag.png]] | ||
| Line 65: | Line 76: | ||
* [[Filename_Filters|Filename Filters]] | * [[Filename_Filters|Filename Filters]] | ||
* [[Other Features|Other features]] | |||
= File Transfer Notes = | = File Transfer Notes = | ||
| Line 99: | Line 110: | ||
== Re-registering the shell extension (Windows only)== | == Re-registering the shell extension (Windows only)== | ||
Especially on Vista it can happen that Drag&Drop fails and you get an error message stating the shell extension doesn't work. In this case you may need to re-register it. Here's how: | Especially on Vista or Windows 7 it can happen that Drag&Drop fails and you get an error message stating the shell extension doesn't work. In this case you may need to re-register it. Here's how: | ||
| Line 107: | Line 118: | ||
2. Navigate to the Filezilla program directory. | 2. Navigate to the Filezilla program directory. | ||
Example (32bit): cd "\Program Files\Filezilla FTP Client"<br> | |||
Example (64bit): cd "\Program Files (x86)\FileZilla FTP Client" | |||
3. Re-register the shell extension. | 3. Re-register the shell extension. | ||
Latest revision as of 19:30, 3 November 2023
Quick Guide
This guide gives you a short overview on how to use FileZilla client. By default you don't have to configure FileZilla, so you can start directly working with the program.
Connecting to an FTP server
Using the Quick Connect bar
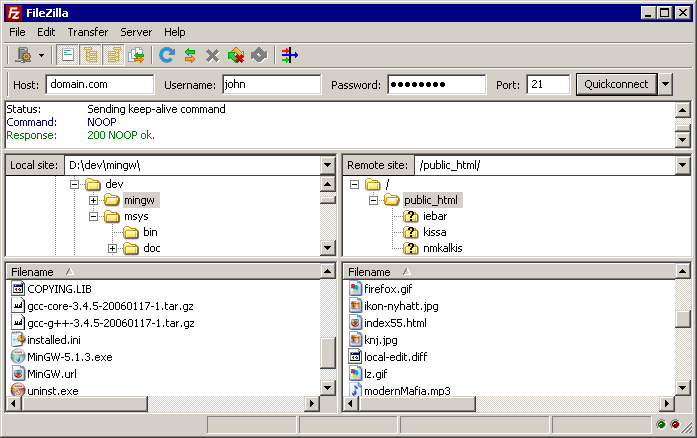
To connect to an FTP server, enter the address of the server into the host field of the Quickconnect bar (e.g. example.com - see image below). If it is a special server type like an SFTP server, add the protocol in front of the address. In case of an SFTP server, start the address with 'sftp://' (e.g. sftp://example.com). Enter the port of the server into the port field if it is not the default port (21 for FTP, 22 for SFTP). If a username / password is required, enter it in the corresponding fields, otherwise the default anonymous logon will be used. Click on Quickconnect or press Enter to connect to the server.
Please notice that the Quick Connect is for... quick connections - so there is no way to edit the quick connections list which stores the last 10 entries. To store FTP server names you should use the Site Manager, instead.
Quick Connect is good for testing the login info before making a site manager entry. Once you connect, you can choose File -> "Copy current connection to Site Manager..." to make a permanent entry. It is usually best to check your login info with Quick Connect before making a permanent entry.
Using Site Manager
You can use the FileZilla Site Manager to specify specific site parameters and connect to the targeted FTP site. The Site Manager allows you to store entries and configure more parameters than the Quick Connect allows.
Special case: Servers in LAN
If the server you are connecting to is in your home LAN, then there is not an address (domain name) as you may know from the Internet. In LAN, you simply use the internal IP address of the server PC. In most cases the network name (computer name) will do, too. If the server is on the same PC as Filezilla, you can even use localhost or 127.0.0.1 as hostname.
NOTE: If you connect from the outside of your LAN this does not apply, you have to use the external (WAN) IP instead.
After a successful connection attempt, a list of files and directories appears on the right side of the main window. The name of the current remote directory is listed in the edit field on the top. Below that you will see the remote directory tree. Under the remote directory is a list of the contents of the current remote directory.
To change the current remote directory:
- Type a directory name into the edit field and press enter, or
- Click a directory in the directory tree, or
- Double-click a directory in the list of the current directory contents
You will notice a directory called ".." listed in virtually all directories. Selecting this directory allows you to go up to the parent directory of the current directory.
Question marks ("?") appear on directories you haven't accessed yet, indicating that the FileZilla Client can't tell if there are subdirectories within those directories. If you access the directory the question mark will vanish.
Navigating on your machine works almost like navigating on the server. The current local directory and the local directory tree are displayed on the left side of the main window by default.
Synchronized Browsing
If you have an identical directory structure on the local machine and the server, you can enable synchronized browsing. This means that any directory navigation on one machine is duplicated on the other.
To enable synchronized browsing, create an entry in the Site Manager, and on the Advanced tab, ensure that the Default local directory and the Default remote directory have the same structure. Then check "Use synchronized browsing", save your settings, and connect.
Directory Comparison
To quickly see differences between files on the local machine and the server, choose View > Directory Comparison, and choose either "compare file size" or "compare modification time." (You also hide identical files by checking that option.) Then choose "Enable."
You will now see color-coded differences between copies of the same file on the different machines. See their meanings here.
Transferring files
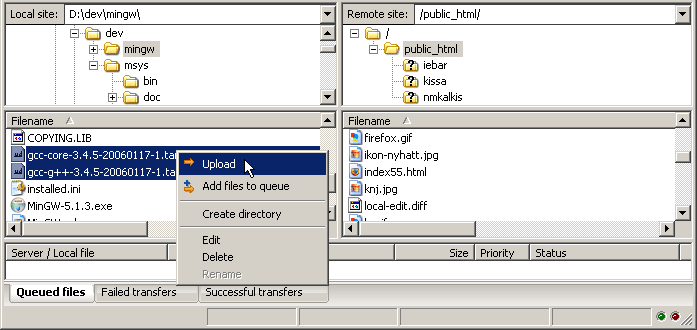
You can upload or download a file by double-clicking on it. It will be added to the transfer queue and the transfer starts automatically. To transfer directories and/or multiple files, select them and right-click the selection. Then you can click on Upload/Download in the popup menu.
You can also drag the files from one side and drop them on the other side. To add files to the queue so that they will be transferred later, select them and click Add to Queue from the popup menu. You may also drag the files directly into the queue. Click on the ![]() button on the toolbar to start the transfer.
button on the toolbar to start the transfer.
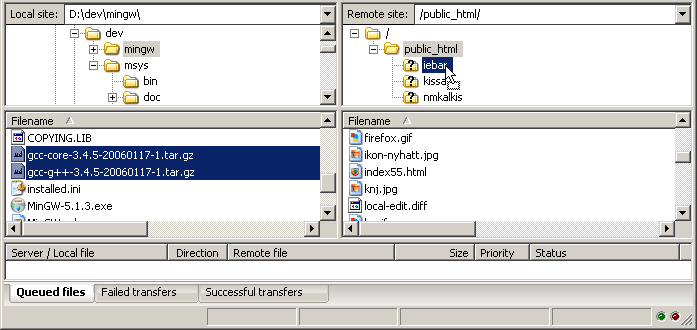
Or, you can click on a file, then drag the file (a box is added to the arrow cursor) to the directory where you want to move it. The directory will be highlighted when you are over it. Let go of the mouse button and the file will be moved to the directory.
Detailed Information Pages
Detailed information on other aspects of the FileZilla client can be found on the following pages:
File Transfer Notes
FileZilla uses multiple FTP sessions. One session gets used purely to browse the server. The other sessions get used to do the file transfers. That way, you can always browse the server even during transfers.
For example, here is a simple car analogy: You order a pizza using your telephone (aka the browsing connection), then you hang up the telephone. Then the delivery man drives the pizza in his car to your location (the transfer connection). While the pizza is transferring, you can phone somebody else, like for example your garage because your own car is broken ;)
Reducing simultaneous connections for incorrectly configured servers
If you get a 421 Too many connections from this IP (<number>) error, the FTP server is restricting your number of connections. There are even servers restricting it to one connection at a time.
The preferred solution would be to contact the server administrator and encourage him/her to configure the server correctly (FTP uses more than one connection by design!). But if you need access immediately, there is a workaround:
1. Open the Site Manager (File - Site Manager... or the first toolbar button)
2. Create an entry for that server, enter all details you know, the more precise, the better
3. Open the 'Transfer Settings' tab
4. Tick the 'Limit number of simultaneous connections' checkbox
5. Enter the desired limit into the 'Maximum number of connections' field
Now, if you connect using the Site Manager entry, connections will be limited.
Note: If you limit connections to 1 only, there is a major drawback: You cannot browse the server anymore while a transfer is in progress!
Troubleshooting
Re-registering the shell extension (Windows only)
Especially on Vista or Windows 7 it can happen that Drag&Drop fails and you get an error message stating the shell extension doesn't work. In this case you may need to re-register it. Here's how:
1. Open a command prompt as administrator. This is important!
Start Menu - All Programs - Accessories: Right Click 'Command Prompt', select 'Run as administrator'
2. Navigate to the Filezilla program directory.
Example (32bit): cd "\Program Files\Filezilla FTP Client"
Example (64bit): cd "\Program Files (x86)\FileZilla FTP Client"
3. Re-register the shell extension.
Type 'regsvr32 fzshellext.dll' (without quotes of course)
4. If you have 64bit OS, you need to perform an additional step.
Type 'regsvr32 fzshellext_64.dll' (no quotes as well)
If you get the reply 'DllRegisterServer in ... succeeded.', you've done it (though you probably still need to reboot your computer).


